Flotilla 8-7 Uniform Information

Images courtesy of Daren Lewis, Flotilla 76, Swan Island, OR
USCG AUXILIARY UNIFORMS
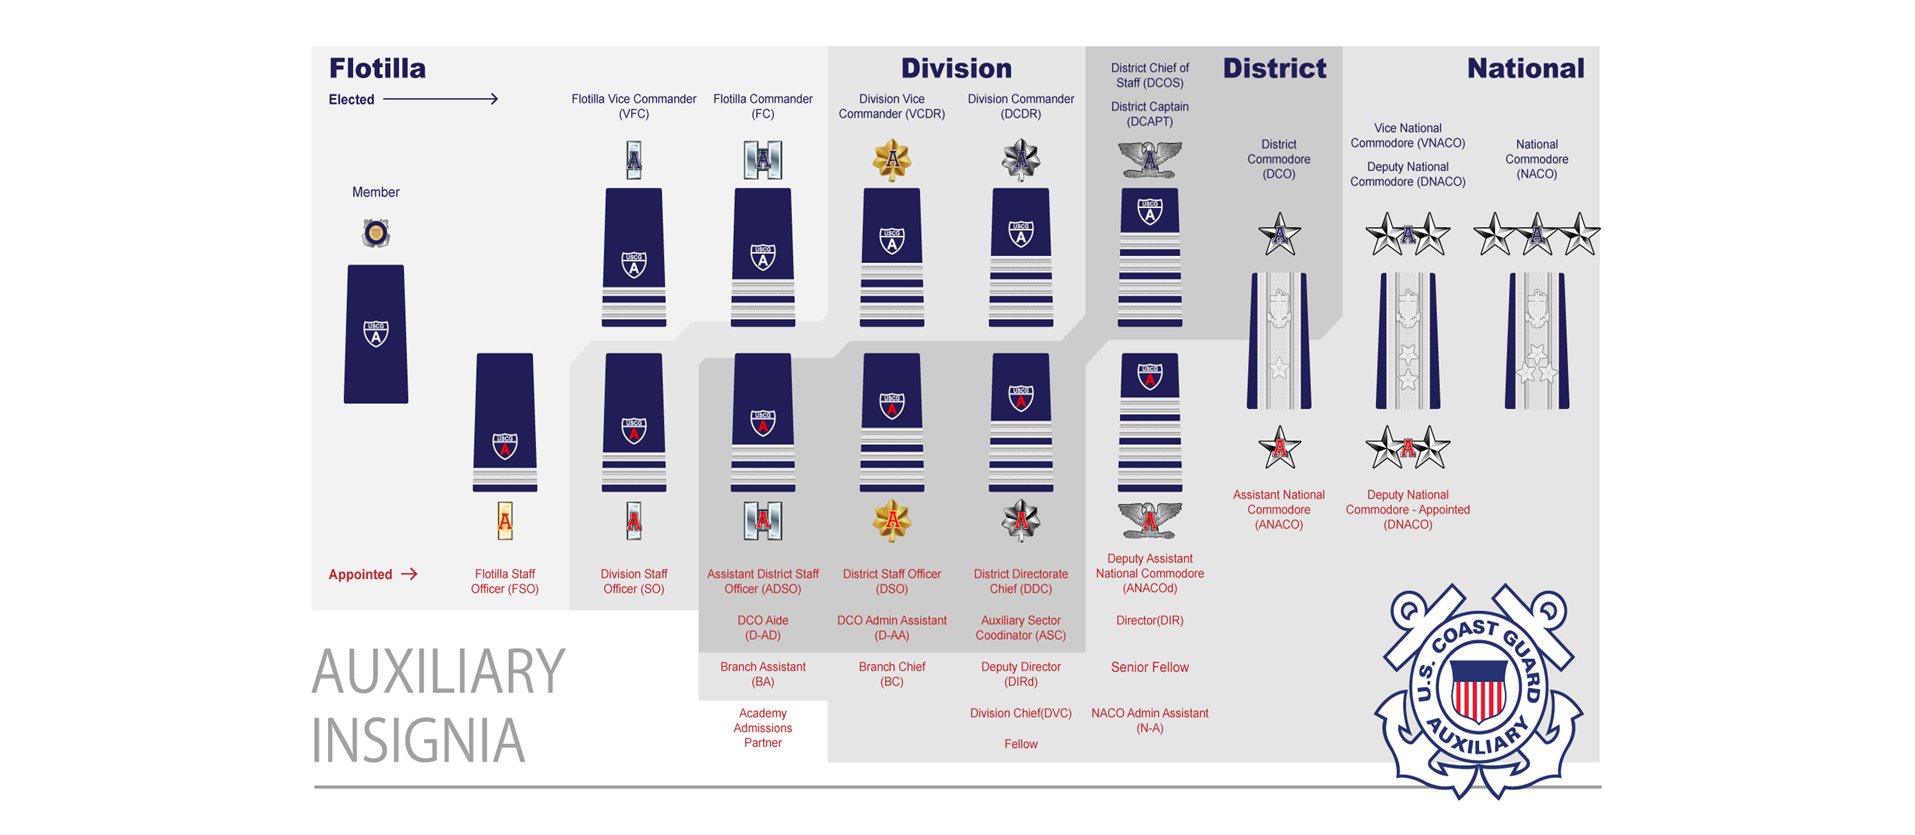
The Coast Guard Auxiliary is the uniformed, volunteer component of the United States Coast Guard. As such, we have the right and the privilege to wear the official uniforms of the Coast Guard, with subtle differences in insignia to identify us to one another, and to active duty Coast Guard members. The most obvious differences: their buttons and braid are gold; ours are silver, and our collar and shoulder insignia all have a small "A" signifying "Auxiliary". Since, to most of the general public, we are virtually indistinguishable from our active-duty shipmates on the "gold side", we are held to the same high standards of dress, grooming, and comportment. We wear the uniform with pride.
WHAT IS THE UNIFORM OF THE DAY?
Different uniforms are worn for different tasks and different levels of formality. With the exception of operational tasks such as watchstanding, safety patrols, or working alongside the Coast Guard, a blue blazer with dress slacks or a skirt will serve on formal occasions, and many Auxiliarists, particularly new members, wear ordinary civilian clothing to flotilla meetings.
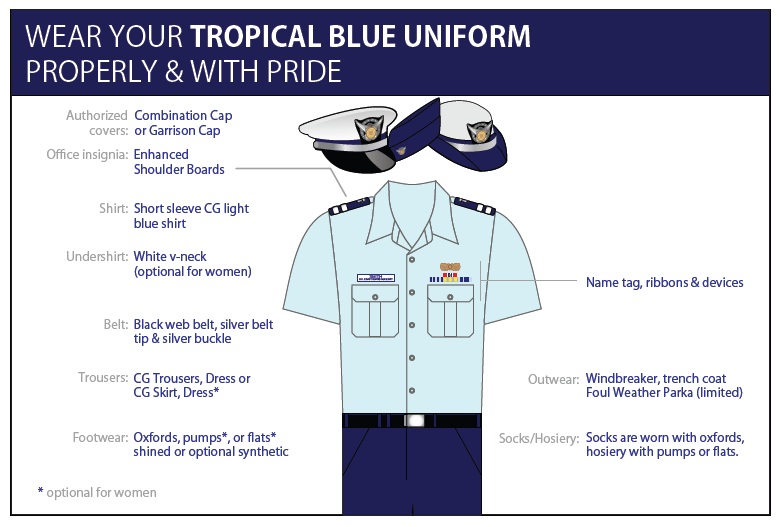
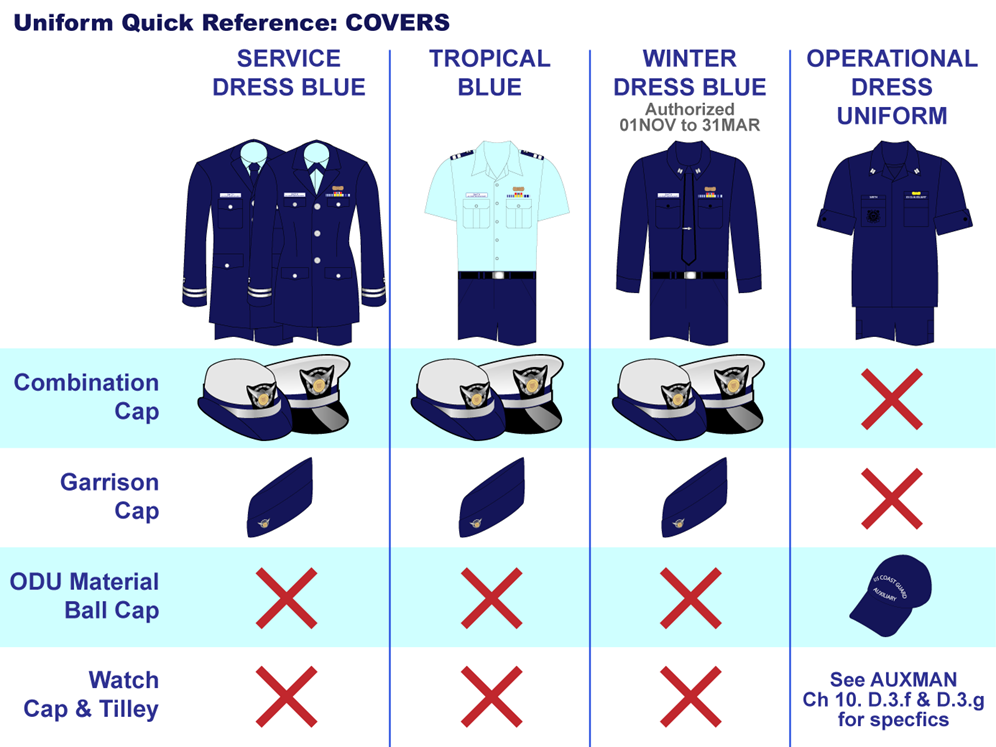
Most auxiliarists can be found owning three basic uniforms: the Tropical Blue ("trops"), the Operational Dress Uniform (ODU) and the Service Dress Blue uniform (SDB) . These uniforms are usually acquired in that order. The Winter Dress Blue (WDB) is specifically authorized as a substitute for the SDB uniform, except on occasions when civilians would wear a coat and tie, which is, in turn specifically authorized to be worn as a substitute for the Trops.
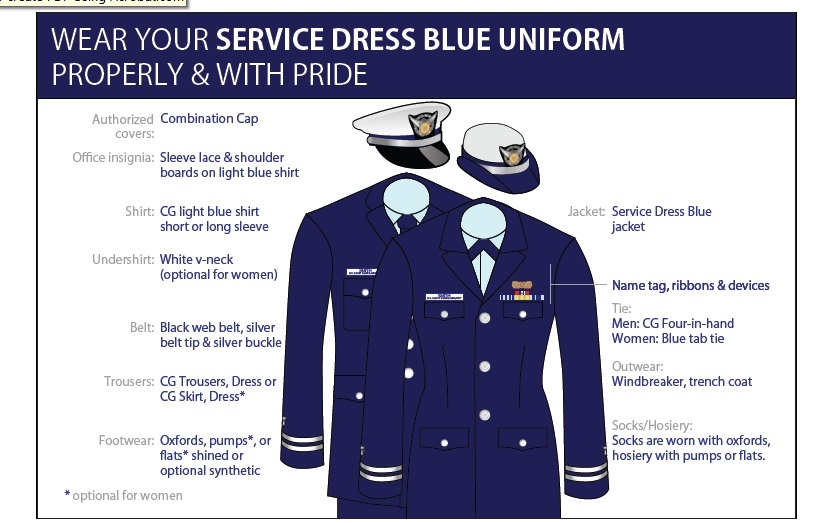
As of the April 2013 revision to the Uniform Manual, the SDB Alpha (A) and Bravo (B) designations have been reinsitituted. The primary difference between the A & B is the use of a long sleeved white shirt with the SDB (A). It is further described as: "Worn year-round by all personnel for functions and situations that require more formality than provided by the SDB "Bravo" uniform, but less than Full Dress or Dinner Dress Uniforms. "
As of January 2015, the following revisions were made:
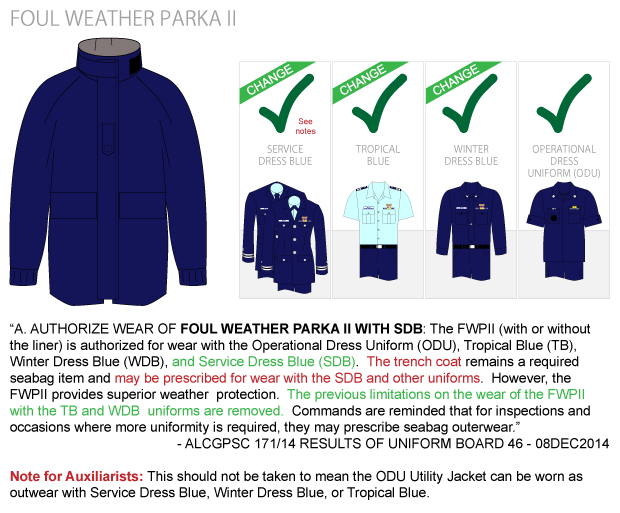
- AUTHORIZE WEAR OF FOUL WEATHER PARKA II WITH SDB: The FWPII
(with or without the liner) is authorized for wear with the
Operational Dress Uniform (ODU), Tropical Blue (TB), Winter Dress
Blue (WDB), and Service Dress Blue (SDB). The trench coat remains a
required seabag item and may be prescribed for wear with the SDB and
other uniforms. However, the FWPII provides superior weather
protection. The previous limitations on the wear of the FWPII with
the TB and WDB uniforms are removed. Commands are reminded that for
inspections and occasions where more uniformity is required, they may
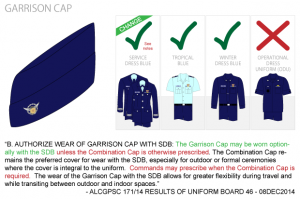
prescribe seabag outerwear. - AUTHORIZE WEAR OF GARRISON CAP WITH SDB: The Garrison Cap may
be worn optionally with the SDB unless the Combination Cap is
otherwise prescribed. The Combination Cap remains the preferred
cover for wear with the SDB, especially for outdoor or formal
ceremonies where the cover is integral to the uniform. Commands may
prescribe when the Combination Cap is required. The wear of the
Garrison Cap with the SDB allows for greater flexibility during travel and while transiting between outdoor and indoor spaces. - EXPAND WEAR OF OPTIONAL UNIT BALL CAPS: The restriction
limiting wear of the unit ball cap to the members unit is removed.
It may now be worn on board any CG unit or DOD facility. The unit
ball cap is an optional item for wear with the ODU, not a seabag
item, and cannot be mandated for wear on board units or for
inspections. The unit ball cap is not authorized for wear while a
student at training commands or where greater uniformity is required. - SUNGLASSES: Authorized sunglass styles now include: Sunglass
frames shall be conservative (unadorned black or navy blue material:
gold or silver wire) and lenses shall be black or brown in color
(mirrored lenses are prohibited). Sunglasses are not authorized in
formation unless the need to wear sunglasses has been certified by
medical authorities, or otherwise authorized by the
commander/commanding officer due to environmental conditions.
Personnel will not wear lenses or frames that are so large or so
small that they detract from the appearance of the uniform. - WRIST WATCHES: The policy is clarified regarding authorized styles and specifying that members may only wear one watch.
Conservative examples are black, brown, navy blue, silver or gold.
Prohibited examples are diamond covered, neon, bright colors, white,
and bands that exceed 1-inch width. Personnel shall not wear watches
that are so large they detract from the appearance of the uniform.
The following gives a brief overview of each of the uniforms. Click on the name for a further description of the uniform and its components.
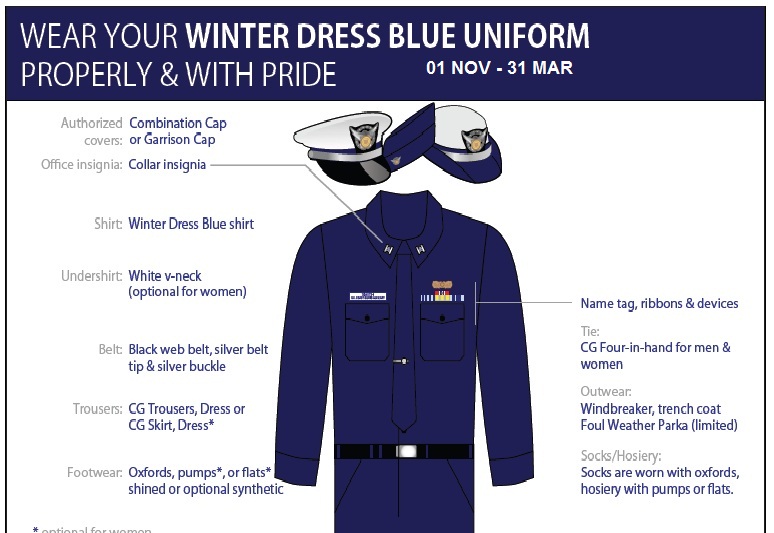
WINTER DRESS BLUE (01 NOV - 31 MAR)
ODU Mentoring Guide (NEW)
For further information, please consult either the CG AUXILIARY UNIFORM PROCUREMENT GUIDE , Chapter 10 of the COAST GUARD AUXILIARY MANUAL or this presentation.
USEFUL UNIFORM LINKS
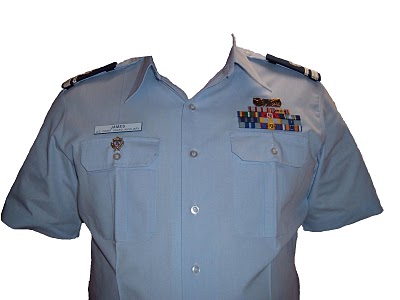
Tips for your Tropical Blue Shirt
Here are some tips to help prep your Tropical Blue Uniform to give it a more formal look for those members who don’t own Winter Dress Blue or Service Dress Blue uniforms. In this article, we will look at pressing your uniform, adding military creases, and tricks for installing your attachments.
PRESSING AND CREASING YOUR UNIFORM SHIRT
Step 1. Pressing the Shirt.
a. Iron with steam and let cool.
b. Starch with no steam to get wrinkles out (do a panel at a time).
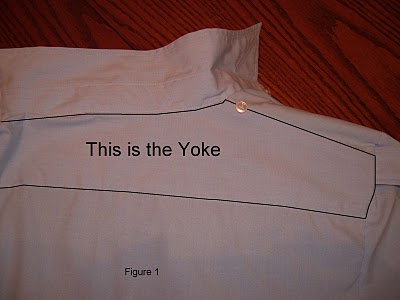
c. The Yoke (figure 1) will need two be starched twice at this step as well as the epilates and collar. This will not be starched later and will help pop your military creases on the back.
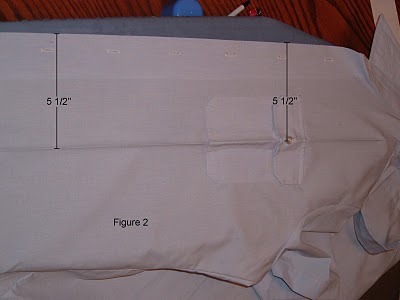
Step 2. Adding the military crease to the front on the shirt.
a. The crease will run right through the shirt pocket button. Measure this distance from the edge of the shirt to the button (see figure 2) This will be the distance from the top to the bottom of the shirt.
b. With no steam very lightly press the crease from the button down to the bottom of shirt.
c. If you feel the crease is right, press with steam.
d. Now starch and iron twice to set the crease.
e. With no steam very lightly press the crease from the button up to the top of shirt and repeat steps C and D.
f. Repeat step 2 for the other side.
Step 3. Sleeve creases.
a. Fold the sleeve in half with the seam at the bottom of the shirt.
b. Lightly crease the shirt with no steam.
c. If you feel the crease is right, press with steam.
d. Starch twice and flip the shirt and starch the backside twice.
e. Repeat steps A, B, C, and D for the other sleeve.
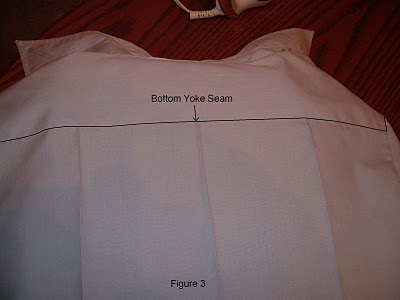
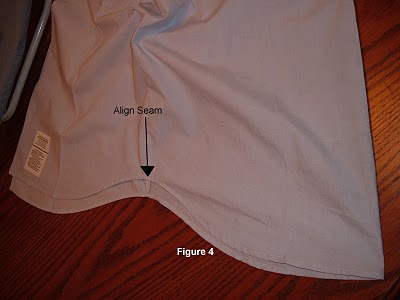
Step 4. Back Creases (DO NOT CREASE ABOVE THE BOTTOM SEAM OF THE YOKE, SEE FIGURE 3)
a. Fold the shirt in half to find where the middle crease will go. This step should be taken with care. This will make your creases straight or angled. (Align the side seams to get the straight crease). (See figure 4).
b. Once the middle is found, lightly crease with no steam.
c. Press middle crease with steam to set temporarily.
d. If you have a DVD case, you can use it to set the width of the other two creases along the back.
e. Use the DVD case width to find your crease and slowly press the crease with the dry iron.
f. Press side crease with steam.
g. Repeat steps E and F for other side crease.
h. Start from one side and starch each side of the crease twice.
i. Work your way to the middle and then the other side by following step H.
Now your shirt is squared away and you’re ready to install your attachments.
ATTACHING YOUR INSIGNIA AND DEVICES.
Set you’re ironing table up with a towel folded a couple of times laid on top. Have some white cardboard, a pair of scissors and a ruler (I like to use a clear ruler).
Cardboard will be used behind the attachments to suck them to the shirt which will stop the drooping appearance. A good starching job to the shirt helps keep this from happening as well.
Step 1. Nametag (If you have an AUXOP device follow step 2)
a. First cut a piece of cardboard the same size as your nametag and set aside.
b. A quick method of finding the general area is to align the name’s middle letter (JAMES would be “m”) with the crease and place your name tag so the clutch posts are parallel with your uniform and the bottom of the name tag is against the top of the pocket. (Clutches pointing towards the top of your shirt).
c. Roll the name tag and push the clutch posts through the shirt. This should be close to the ¼ inch spacing from the top of the pocket.
d. Now fine tune the spacing with the ruler.
e. Place the cardboard piece you cut earlier inside of the shirt and align with your name tag and push the clutch posts through the cardboard and secure the clutches to the posts.
f. Check for alignment.
Step 2. Ribbons and Insignia/devise (if you only have ribbons, follow steps A through F of step 1)
a. Start with your ribbons and follow steps B, C, and D of step 1.
b. If you have any other insignia/devise follow steps B, C, and D of step 1 using the ribbons like you would the top of the shirt pocket.
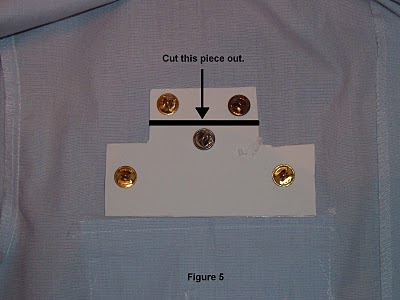
c. This step is a little trickier then with your name tag. Take a piece of cardboard (this piece should be white) and place on top of your ribbons and device. Cut cardboard to the general size and then attach like step E and trim as necessary.
d. Once cut to size, attach clutches and check for alignment.(See Figure 5)
RIBBONS CHART
Recent Uniform Changes
Fri, 27 Jan 17